


Table of contents


No headings in the article.
PyQt is a Python library used for creating graphical user interfaces (GUIs) for desktop applications.
It is a set of Python bindings for the Qt application framework, which is a popular and powerful C++ GUI toolkit used for building cross-platform applications. PyQt provides a range of modules and classes for creating graphical user interfaces, including buttons, labels, text boxes, and more.
The ✨Logic✨
Every PyQt application is built on two fundamental objects -
QApplication -
Deals with event-handling and initialization. It does all the stuff that happens under the hood and is mostly automatic.MainWindow -
Handles graphic elements and logic, done manually.
Graphical elements of PyQt are called 'Widgets' and are created by the user to be displayed on the screen, for example - buttons or textfields.
The ✨Implementation✨
If you've never worked with PyQt before, you need to install it by running the following command in windows command prompt(CMD) or powershell, and in the terminal for mac users.
pip install PyQt5
Once this is downloaded, fire up your IDE and start writing a basic GUI application.
import sys
from PyQt5.QtWidgets import QApplication, QWidget
if __name__ == "__main__": #checks if the script is being run as the main program
    app = QApplication(sys.argv) #takes a command line argument from the user
    w = QWidget() #creates the main widget
    w.resize(300,300) #sets the size of the window to 300x300
    w.setWindowTitle("Basic program1") #sets the title for the widget
    w.show() #displays the window
    sys.exit(app.exec_()) #starts the Qt event loop and waits for user interaction to stop
To start off, you need to import the sys module along with the required 'widgets' to create a window. The other lines basically create a window of size 300x300 named 'Basic program1'. Line-by-line explanations are given through comments in the code above.
If there are no command line arguments to be given, we can replace the line app = QApplication(sys.argv) with app = QApplication([]) and thereby would not have to import the sys module.
Before we jump into making the actual program, look at some of the commonly used widgets :
QLabel: A widget used to display text or an image.
QPushButton: A widget used to display a clickable button.
QLineEdit: A widget used to accept a single line of text input.
QTextEdit: A widget used to accept multiple lines of text input.
QCheckBox: A widget used to display a checkbox.
QRadioButton: A widget used to display a radio button.
QComboBox: A widget used to display a drop-down list of options.
QSpinBox: A widget used to display a spin box for numerical input.
QSlider: A widget used to display a slider for adjusting a value within a range.
QProgressBar: A widget used to display a progress bar.
Now, for the actual calculator;
✨Building the calculator✨
Part I: Base template -
import PyQt5.QtWidgets as qtw
class MainWindow(qtw.QWidget): #where the widgets are added
    def __init__(self):
        super().__init__()
        self.setWindowTitle("Calculator")
        self.show()

app = qtw.QApplication([])
mw = MainWindow()
app.exec_()
First, the code imports the PyQt5 QtWidgets module containing all the required widgets and renames it as qtw for convenience.
Next, a new class named MainWindow is defined that inherits from the PyQt5 QWidget class. The __init__ method of the MainWindow class calls the __init__ method of its superclass using the super() function, which initializes the MainWindow object as a QWidget. All the visual elements of the program are defined here.
The MainWindow object is then created by calling its constructor with no arguments, which sets up the window with default size and properties. Finally, the show() method is called on the MainWindow object to display the window on the screen.
The QApplication object is created with an empty list [] as its argument. This is because QApplication is the top-level application object and requires a list of command-line arguments, but in this case, we have no command-line arguments to pass, so an empty list is used.
Finally, the MainWindow object is created and stored in the variable mw. The exec_() method of the QApplication object is called to start the event loop and run the application. This event loop waits for user events such as mouse clicks, key presses, and so on, and handles them as they occur.
Part II : Layout -
Whenever we create a new widget, since there is no specific layout for the program, Qt will not know where to put it. To specify the location of widgets, there are a few pre-made layouts that we can use, such as the QV (vertical layout), the QH (horizontal layout) and the QGrid Layout. For the main window, we'll use a QV layout, and for the inner calculator keypad, we'll create a grid layout.
import PyQt5.QtWidgets as qtw
class MainWindow(qtw.QWidget): #where the widgets are added
    def __init__(self):
        super().__init__()
        self.setWindowTitle("Calculator")
        self.setLayout(qtw.QVBoxLayout())
        self.keypad()

        self.show()

    def keypad(self):
        container = qtw.QWidget()
        container.setLayout(qtw.QGridLayout())

        self.result_field = qtw.QLineEdit()
        result = qtw.QPushButton('Enter')
        clear = qtw.QPushButton('Clear')
        b9 = qtw.QPushButton('9')
        b8 = qtw.QPushButton('8')
        b7 = qtw.QPushButton('7')
        b6 = qtw.QPushButton('6')
        b5 = qtw.QPushButton('5')
        b4 = qtw.QPushButton('4')
        b3 = qtw.QPushButton('3')
        b2 = qtw.QPushButton('2')
        b1 = qtw.QPushButton('1')
        b0 = qtw.QPushButton('0')
        plus = qtw.QPushButton('+')
        mins = qtw.QPushButton('-')
        mult = qtw.QPushButton('*')
        div = qtw.QPushButton('/')


app = qtw.QApplication([])
mw = MainWindow()
app.exec_()
As you can see in the code above, we've added a new function keypad() containing the buttons of our calculator. This was done just to give it a seperate layout.
In lines 6 and 11, we've set the layouts for the widgets using .setLayout(qtw.Layouttype) However, if you run this code, you can see that none of the widgets actually appear on the screen. This is because we haven't actually added the widgets to the layout, they're just... there. To add these to the layout, we need to understand how grid layouts work -
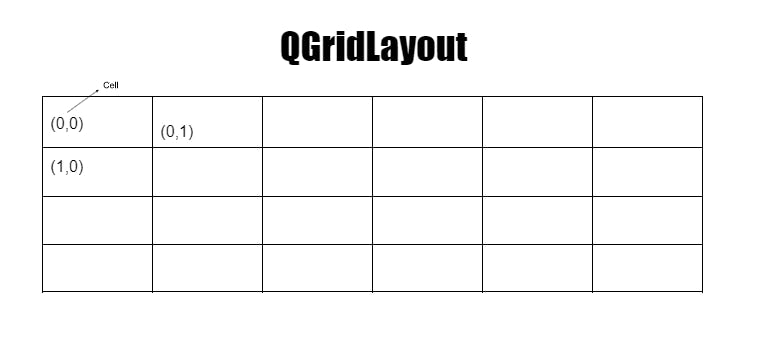
In each of these 'Cells', we need to position our widgets to match the grid layout. The coordinates of the cell begin with 0,0 and so on. To add a widget in a cell, we use addWidget('widget name',3,4,2,4), which takes in 5 parameters - the widget to be added, the coordinates and the span of the cell. This span is simply the number of rows and columns our cell stretches across; the 4th parameter being for the rows and the 5th for the columns. To implement this, add the following code after declaring all the widgets -
container.layout().addWidget(self.result_field, 0, 0, 1, 4)
container.layout().addWidget(result, 1, 0, 1, 2)
container.layout().addWidget(clear, 1, 2, 1, 2)
container.layout().addWidget(b9, 2, 0)
container.layout().addWidget(b8, 2, 1)
container.layout().addWidget(b7, 2, 2)
container.layout().addWidget(b6, 3, 0)
container.layout().addWidget(b5, 3, 1)
container.layout().addWidget(b4, 3, 2)
container.layout().addWidget(b3, 4, 0)
container.layout().addWidget(b2, 4, 1)
container.layout().addWidget(b1, 4, 2)
container.layout().addWidget(b0,5,0,1,3)
container.layout().addWidget(plus, 2,3)
container.layout().addWidget(mins, 3, 3)
container.layout().addWidget(mult, 4, 3)
container.layout().addWidget(div, 5, 3)
self.layout().addWidget(container) #adds all the widgets to the main window
Notice how we have used the self keyword in both the declaration of the result_field as well as while adding it to the layout. This is just to make result_field accessible outside of this method, so that we can use the input from here and incorporate it into our final step, the calculator logic.
Part III : The calculator Logic -
Every Qt widget can send signals and has slots for recieving signals from other widgets.Whenever an event takes place, widgets send signals to other widgets. This is essentially how widgets communicate with each other.
For this calculator, we'll use the 'clicked' signal which is emitted when a button is clicked, and use the setText() slot to change the text of the result_field when it recieves the clicked signal from the buttons.
To start off, we'll need a method that changes the text field according to the button that is pushed. We can do this by associating a seperate function for each of the buttons. For example, if we press the button '5', it'll set the function number(N) to 5.
Moreover, we'll need to create seperate function for each operator, that uses the value passed to it to perform a specific operation on the numbers passed.
The two main things we need to do now are to update the text_field methodically once any button is pressed and to display the answer when the enter button is clicked.
def __init__(self):
    super().__init__()
    self.setWindowTitle("Calculator")
    self.setLayout(qtw.QVBoxLayout())
    self.keypad()
    self.tnum = []
    self.fnum = []
Firstly, enter in the __init__ method, define two lists using self. so that they can be accessed when objects are made.The first list, tnum, stores the numerical values passed to the widget slots in the form of strings inside the list. Similarly, the second list, fnum, stores the final typed in string, combining the operator and the digits.
def keypad(self):
    container = qtw.QWidget()
    container.setLayout(qtw.QGridLayout())

    self.result_field = qtw.QLineEdit()
    result = qtw.QPushButton('Enter', clicked = self.resultf)
    clear = qtw.QPushButton('AC',clicked = self.clearf)
    b9 = qtw.QPushButton('9', clicked=lambda: self.num_press('9'))
    b8 = qtw.QPushButton('8',clicked=lambda: self.num_press('8'))
    b7 = qtw.QPushButton('7',clicked=lambda: self.num_press('7'))
    b6 = qtw.QPushButton('6',clicked=lambda: self.num_press('6'))
    b5 = qtw.QPushButton('5',clicked=lambda: self.num_press('5'))
    b4 = qtw.QPushButton('4',clicked=lambda: self.num_press('4'))
    b3 = qtw.QPushButton('3',clicked=lambda: self.num_press('3'))
    b2 = qtw.QPushButton('2',clicked=lambda: self.num_press('2'))
    b1 = qtw.QPushButton('1',clicked=lambda: self.num_press('1'))
    b0 = qtw.QPushButton('0',clicked=lambda: self.num_press('0'))
    plus = qtw.QPushButton('+',clicked=lambda: self.func_press('+'))
    mins = qtw.QPushButton('-',clicked=lambda: self.func_press('-'))
    mult = qtw.QPushButton('*',clicked=lambda: self.func_press('*'))
    div = qtw.QPushButton('/',clicked=lambda: self.func_press('/'))
Secondly, inside the keypad function, we create a lambda function for each of the buttons, which passes the numerical value from the button to the num_press function. If you're getting an error around this part, it's because you haven't imported the lambda function. You can do that be writing the following statement at the top of your program - from _ast import Lambda . A lambda function is basically a short, one-time use function that you can use instead of creating full-length functions for each of the buttons. Here, we call four functions - resultf(), clearf(), num_press() and func_press() - which each perform a seperate function which we'll look at below.
def num_press(self,key):
    self.tnum.append(key)
    tstring = ''.join(self.tnum)
    if self.fnum:
        self.result_field.setText(''.join(self.fnum)+tstring)
    else:
        self.result_field.setText(tstring)

def func_press(self,operator):
    tstring = ''.join(self.tnum)
    self.fnum.append(tstring)
    self.fnum.append(operator)
    self.tnum = []
    self.result_field.setText(''.join(self.fnum))
def resultf(self):
    fstring = ''.join(self.fnum)+''.join(self.tnum)
    rstring = eval(fstring)
    fstring += '='
    fstring += str(rstring)
    self.result_field.setText(fstring)
def clearf(self):
    self.result_field.clear()
    self.tnum = []
    self.fnum = []
Add the following code after the part where you add the widgets to the layout.
num_press() :
The num_press function appends the value of the button we've pressed to the tnum list. For example we press 4, then the value of tnum becomes ['4']. It then creates a new string tstring to store the value of tnum, just so python doesn't start evaluating it like an integer, so that the written expression can be displayed in result_field first. It then has an if statement which basically just checks if a number or operator has been added to fnum before, and joins the new given number to tstring if so. Otherwise, it just sets the text of the result field to the given number.
func_press() :
The func-press() function joins the values of tstring (containing the numerical value) and the operator which is passed in. It then sets tnum back to an empty string so that another number can be typed in (or rather pressed in). Lastly, it sets the text field to fnum, which contains the final expression (number + operator) typed in by the user.
resultf() :
The resultf() function joins fnum (first number+operator) to the second number. It then creates a variable rstring that stores the evaluated form of the expression and adds an equal sign. Then, it sets the completed string fstring as the text field.
clearf() :
As the name clearly suggests, this function clears the result_field and resets both the lists.
✨Final product✨
The code for the final calculator is as follows :
from _ast import Lambda
import PyQt5.QtWidgets as qtw
class MainWindow(qtw.QWidget): #where the widgets are added
    def __init__(self):
        super().__init__()
        self.setWindowTitle("Calculator")
        self.setLayout(qtw.QVBoxLayout())
        self.keypad()
        self.tnum = []
        self.fnum = []

        self.show()

    def keypad(self):
        container = qtw.QWidget()
        container.setLayout(qtw.QGridLayout())

        self.result_field = qtw.QLineEdit()
        result = qtw.QPushButton('Enter', clicked = self.resultf)
        clear = qtw.QPushButton('AC',clicked = self.clearf)
        b9 = qtw.QPushButton('9', clicked=lambda: self.num_press('9'))
        b8 = qtw.QPushButton('8',clicked=lambda: self.num_press('8'))
        b7 = qtw.QPushButton('7',clicked=lambda: self.num_press('7'))
        b6 = qtw.QPushButton('6',clicked=lambda: self.num_press('6'))
        b5 = qtw.QPushButton('5',clicked=lambda: self.num_press('5'))
        b4 = qtw.QPushButton('4',clicked=lambda: self.num_press('4'))
        b3 = qtw.QPushButton('3',clicked=lambda: self.num_press('3'))
        b2 = qtw.QPushButton('2',clicked=lambda: self.num_press('2'))
        b1 = qtw.QPushButton('1',clicked=lambda: self.num_press('1'))
        b0 = qtw.QPushButton('0',clicked=lambda: self.num_press('0'))
        plus = qtw.QPushButton('+',clicked=lambda: self.func_press('+'))
        mins = qtw.QPushButton('-',clicked=lambda: self.func_press('-'))
        mult = qtw.QPushButton('*',clicked=lambda: self.func_press('*'))
        div = qtw.QPushButton('/',clicked=lambda: self.func_press('/'))

        container.layout().addWidget(self.result_field, 0, 0, 1, 4)
        container.layout().addWidget(result, 1, 0, 1, 2)
        container.layout().addWidget(clear, 1, 2, 1, 2)
        container.layout().addWidget(b9, 2, 0)
        container.layout().addWidget(b8, 2, 1)
        container.layout().addWidget(b7, 2, 2)
        container.layout().addWidget(b6, 3, 0)
        container.layout().addWidget(b5, 3, 1)
        container.layout().addWidget(b4, 3, 2)
        container.layout().addWidget(b3, 4, 0)
        container.layout().addWidget(b2, 4, 1)
        container.layout().addWidget(b1, 4, 2)
        container.layout().addWidget(b0,5,0,1,3)
        container.layout().addWidget(plus, 2,3)
        container.layout().addWidget(mins, 3, 3)
        container.layout().addWidget(mult, 4, 3)
        container.layout().addWidget(div, 5, 3)
        self.layout().addWidget(container)

    def num_press(self,key):
        self.tnum.append(key)
        tstring = ''.join(self.tnum)
        if self.fnum:
            self.result_field.setText(''.join(self.fnum)+tstring)
        else:
            self.result_field.setText(tstring)

    def func_press(self,operator):
        tstring = ''.join(self.tnum)
        self.fnum.append(tstring)
        self.fnum.append(operator)
        self.tnum = []
        self.result_field.setText(''.join(self.fnum))
    def resultf(self):
        fstring = ''.join(self.fnum)+''.join(self.tnum)
        rstring = eval(fstring)
        fstring += '='
        fstring += str(rstring)
        self.result_field.setText(fstring)
    def clearf(self):
        self.result_field.clear()
        self.tnum = []
        self.fnum = []


app = qtw.QApplication([])
mw = MainWindow()
app.setStyle(qtw.QStyleFactory.create('Fusion'))
app.exec_()
...and that was how to create a calculator with PyQt!
Github repository - https://github.com/fa22991/PyQt-Calculator