


Table of contents
PDFs (portable document format), CSVs (comma-separated value files) and spreadsheets are a few of the most popular file formats existing today. Python provides a couple of tools to efficiently manipulate, analyze and work with such formats.
CSV files
A CSV file stores tabular data (numbers and text) in plain text. Each line of the file is a data record consisting of one or more fields, separated by commas. To work with such files, Python has a built-in module called 'csv'.
 import csv
 data = open("colors.csv",encoding="utf-8") #opening the file
 csv_data = csv.reader(data) #reading from the file
 data_lines = list(csv_data) #creating a list

 for line in data_lines[:5]:
     print(line)
For example, the file we're working with, called 'colors.csv', contains three columns - the name of the colour, its hex code and its RGB value. The first few lines open the file, read data from it, and store the said data in a list. The for loop, however, is used to print individual rows from the list upto the 5th row (
data_line[:5]splices the list to the 5th row).But here comes another question. How could you get only the RGB values of each colour up to line 5?
 for line in data_lines[:5]:
     print(line[2])
We know that the third column contains the RGB values. We also know that list indexing starts from index 0, making the index position of the third column 2. So, by replacing
linewithline[2], we can access the values in the third column of the 5 rows.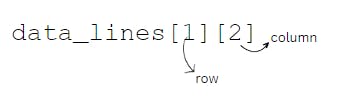
Since
data_lines[i](i because the value keeps changing as the loop progresses) isline,line[2]gives the same output as the above-mentioned.Now imagine you wanted to store the hex values (2nd column) of all the rows in 'colors.csv'. To do this, we could start by creating an empty list, to which we could then append the hex values of each row as we go through them.
 import csv
 data = open("colors.csv",encoding="utf-8") #opening the file
 csv_data = csv.reader(data) #reading from the file
 data_lines = list(csv_data) #creating a list

 hex_values = []

 for line in data_lines[1:]: #Excluding the first row (labels)
     hex_values.append(line[1]) #attaching each hex code to the list

 print(hex_values)
Everything mentioned above dealt with reading data from a CSV file, but what if you wanted to write to one? To do that, you just need to change the 'mode' when you open the file from 'r' for reading to 'w' for writing, and use CSV 'writer'.
 import csv
 colors = open('colors.csv',mode='w',newline='')
 writer = csv.writer(colors,delimiter=',')
 writer.writerows([['red','#ff0000','rgb(255,0,255)'],['green','#00ff00','rgb(0,255,0)']])
 colors.close()
This piece of code overrides the current contents of 'colors' and writes 2 new rows instead - using 'writerows'. The code for modifying a CSV file is similar to that for reading from one. While creating the writer, the 'delimiter' parameter basically specifies what we want to use to separate our columns.
If you don't want to override the current contents but do want to add rows to the file, changing the mode from 'w' to 'a' (for append) allows you to add content to the bottom of the CSV files without modifying any of its current contents.PDF files
To work with PDFs in Python, you can install the PyPDF2 library using the following pip command :
pip install PyPDF2Reading a PDF Document
To read a PDF document using PyPDF2, you first need to open the document using the
PdfReaderclass. Once you have opened the document, you can access its various properties, such as the number of pages or the document information.import PyPDF2 with open('sample.pdf', 'rb') as pdf_file: pdf_reader = PyPDF2.PdfReader(pdf_file) # Print the number of pages in the document print(len(pdf_reader.pages)) # Print the document information print(pdf_reader.metadata)Extracting Text
Extracting text from a PDF document is one of the most common tasks when working with PDF files. PyPDF2 provides a simple interface to extract text from a PDF document using the
PdfReaderclass.import PyPDF2 pdf_file = open('sample.pdf', 'rb') pdf_reader = PyPDF2.PdfReader(pdf_file) # Extract text from the first page page = pdf_reader.pages[0] text = page.extract_text() print(text)Merging Text
Merging multiple PDF documents into a single document is another common task when working with PDF files. PyPDF2 provides a simple interface to merge PDF documents using the
PdfMergerclass.import PyPDF2 pdf_merger = PyPDF2.PdfMerger() # Add PDF documents to the merger pdf_merger.append('document1.pdf') pdf_merger.append('document2.pdf') # Merge the documents and save the output with open('merged_document.pdf', 'wb') as output: pdf_merger.write(output)The code above merges the two pdfs into one document which we've named 'merged_document.pdf'.
Encrypting a PDF Document
Encrypting a PDF document is a great way to protect sensitive information. PyPDF2 provides a simple interface to encrypt a PDF document using the
PdfWriterclass.import PyPDF2 pdf_file = open('sample.pdf', 'rb') pdf_reader = PyPDF2.PdfReader(pdf_file) pdf_writer = PyPDF2.PdfWriter() # Copy the pages from the original document to the new document for page_num in range(len(pdf_reader.pages)): pdf_writer.add_page(pdf_reader.pages[page_num]) # Set the encryption parameters pdf_writer.encrypt('password', 'random', use_128bit=True) # Save the encrypted document with open('encrypted_document.pdf', 'wb') as output: pdf_writer.write(output)This piece of code creates a new document (encrypted_document.pdf) to which it copies pages from the original document and then sets a password that restricts access to it. The
encrypt()method of PyPDF2'sPdfWriterclass is used to add password-based encryption to a PDF document. The pdf_writer.encrypt() takes the password to put on the document, which in this case is 'random' and an optional use_128bit parameter which specifies whether to use a 40-bit or 128-bit encryption (128 if set to true, and 40 if not).Spreadsheets
One of the most popular Python libraries for working with files is
openpyxl, a library for working with Excel (.xlsx) files.Installing openpyxl
To install openpyxl, run the following command.
pip install openpyxlReading Data from a Spreadsheet
To read data from the spreadsheet, the function
load_workbookis used.import openpyxl # Load the workbook workbook = openpyxl.load_workbook('sample.xlsx') # Select the worksheet worksheet = workbook.active # Print the values of the cells in the first row for cell in worksheet[1]: print(cell.value)In this code snippet, we first load the Excel file 'sample.xlsx' using the
load_workbook()function, then select the active worksheet using theactiveattribute of the workbook object. Finally, we iterate over the cells in the first row of the worksheet using a for loop and print the value of each cell using itsvalueattribute.Writing Data to a Spreadsheet
Next, let's look at how we can write data to an Excel file using openpyxl. Here's a code snippet that demonstrates how to create a new Excel file and write some data to it:
 import openpyxl

 # Create a new workbook
 workbook = openpyxl.Workbook()

 # Select the worksheet
 worksheet = workbook.active

 # Write some data to the worksheet
 worksheet['A1'] = 'Name'
 worksheet['B1'] = 'Age'
 worksheet['A2'] = 'Alice'
 worksheet['B2'] = 25

 # Save the workbook
 workbook.save('output.xlsx')
In this code snippet, we first create a new Excel workbook using the
Workbook()function. We then select the active worksheet using theactiveattribute of the workbook object. Finally, we write some data to the worksheet by assigning values to the appropriate cells using indexing and save the workbook as 'output.xlsx'. Note that we can use either letters or numbers to index the columns.Modifying an Existing Spreadsheet
Finally, let's look at how we can modify an existing Excel file using openpyxl. Here's a code snippet that demonstrates how to load an Excel file, modify some of its contents, and save the changes:
 import openpyxl

 # Load the workbook
 workbook = openpyxl.load_workbook('sample.xlsx')

 # Select the worksheet
 worksheet = workbook.active

 # Modify some of the cell values
 worksheet['A2'] = 'Bob'
 worksheet['B2'] = 30

 # Save the changes to the workbook
 workbook.save('sample.xlsx')
In this code snippet, we first load the Excel file 'sample.xlsx' using the
load_workbook()function. Finally, we modify some of the cell values using indexing and save the changes to the workbook using thesave()function.
Project Ideas using file manipulation
Budget Analyzer: Create a program that reads in a CSV file containing income and expenses data and generates a summary report. Users can specify the date range for the report, and the program can calculate the total income, total expenses, and net income for the period.
Invoice Generator: Create a program that generates PDF invoices based on a CSV file containing customer information and order details. Users can customize the invoice format, including the logo, header, footer, and payment terms.
Movie Recommendation Engine: Create a program that reads in a CSV file containing movies' rating data and uses collaborative filtering to recommend movies to users. The program can generate a list of top-rated movies, similar movies, and personalized recommendations based on the user's previous ratings.